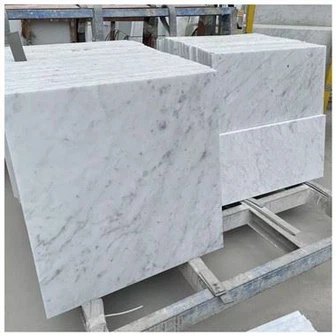
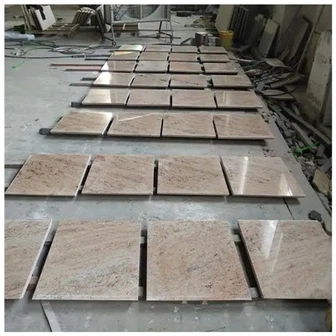
Reviewing Taj Mahal Quartzite slab photos before cutting a vanity, island, or backsplash
How to review Taj Mahal quartzite slab photos before cutting a vanity, island, or backsplash
A contractor once sent me a cropped photo of a calm cream area and asked whether it matched the approved sample. It did. The problem sat 900 mm to the left, where a stronger brown band would later run through the only waterfall return. By the time we saw the full slab image, the cabinet had been made to suit the earlier cut plan. We were not choosing stone anymore. We were choosing which compromise would look least odd.
I keep that image in mind whenever somebody says a small photo is enough. Don't ask me how I know, but the most expensive part of a slab is often the part nobody included in the approval email. A sink cutout can remove the quiet field. A backsplash can consume the only useful continuation. A miter can turn a gentle line into a broken corner.

Here is what I'd do: require a full, straight-on photograph with scale reference, then place the final cut layout over it. That is the point where a stone decision becomes a room decision. This is where you don't cheap out.
Read Taj Mahal quartzite slab photos as a cut drawing
Begin with the full slab, not the prettiest window inside it. Look at the background warmth, major movement, fissures that are part of the natural character, and the amount of calm material on either side. Then ask what each cut needs to show. A vanity may need quiet zones around two basins. A waterfall island may need movement that can travel across a miter. A wall panel may need one long field that survives outlet openings.
Full slab approval needs a reference dimension. I want to know the slab length and width, the direction of the photograph, and which edge will become the finished front edge. Without that, an arrow on an image can be misleading. With it, the fabricator can discuss rotation, seam location, and yield before the project team gets emotionally attached to one cropped detail.
When reviewing a Taj Mahal Quartzite slab, I also compare it with the cabinet finish, faucet sample, and wall lighting where the stone will actually live. A photo taken under warehouse light is honest about movement, but it cannot predict every reflection in a finished bathroom or kitchen. The final approval needs both the material record and a small physical finish mock-up.
Mark cuts before discussing beauty
Quartzite cut layout begins with the drawing. Put sink openings, faucet holes, edge returns, backsplash strips, miter zones, and panel seams on the slab image. Do not wait until after the material has been selected. The marking often changes which piece should come from which area. It may also show that two matching vanity tops need more material than one slab can give.
The Taj Mahal Quartzite Wash Basin is a good reminder that an opening is never just a hole. It has corners, a drain, a faucet position, and a relationship with the cabinet below. I want all of those marks on the photo before anyone calls the slab approved.
Compare more than one slab when the project repeats
Natural stone batch review is especially important for a hotel floor or a residence with several bathrooms. Two slabs can share a cream background yet carry their gold lines at very different intensity. That may be completely acceptable if the rooms are separate. It becomes a problem when the two pieces meet in one double vanity or on adjacent wall panels.
I lay the full photos side by side in the same orientation. I check overall warmth first, then movement density, then whether there is enough material for each room type. Lighting changes what the eye sees, so I do not promise that every slab will look identical after installation. I do insist that the team sees the range before cutting begins.
The photo set I keep with every stone approval
| Photo or record | What I look for | Decision it protects |
|---|---|---|
| Full-face slab photo | Overall tone, vein direction, usable calm zones, and slab edges | Whether the chosen slab can actually carry all visible pieces |
| Marked cut layout | Sink holes, miters, seams, splashes, and finished front edges | Movement landing in the right place after fabrication |
| Batch comparison board | Relative warmth and movement across all reserved slabs | Consistent reading in adjacent rooms and paired pieces |
| Finish and lighting mock-up | Reflection and cabinet relationship under specified lighting | A finish that works after installation, not only in storage |
The Hard-Won Lesson: The crop hid the only calm corner
A 2.8 metre island was approved from a centred crop and a CAD plan. When we overlaid the finished mitered return on the full image, the calm corner had already been assigned to a narrow backsplash strip. The island could still be produced, but the visible end would carry a dark diagonal mark beside the stools. We changed the layout, remade the strip list, and held fabrication for two days.
The Lesson: Never approve a crop until every finished piece has been drawn on the whole slab.
Understanding full-slab approval in current projects
Why I ask for photographs before a final cutting list
The cutting list tells us dimensions. The photo tells us consequence. Together, they make a workable approval. I do not need a project team to become stone inspectors. I need them to see the main movement, the visible faces, and the places where an opening changes the balance of the piece.
How photos connect to cabinets and walls
The Complete Guide to Bathroom Vanity Top and Cabinet Packages for Hotels and Residences makes the larger point: the stone does not arrive alone. A top needs cabinet dimensions. A panel needs a wall elevation. A sink needs a bowl sheet. Put those records beside the slab photo and the conversations become much shorter.
What to do when a delivered slab does not match the approval record
Take full-face and close photographs immediately, include the slab label and a scale, and do not release it for cutting. Compare it with the approved image and batch sheet, then contact the supplier with both records. The first response is not to search for a better crop. It is to document the full condition, pause the cut, and let the team compare evidence.

Questions I hear before slab approval
1. Why are Taj Mahal quartzite slab photos better than sample photos?
A sample shows colour and a small part of the surface. A full photo shows the movement, usable sections, edges, and the relationship between all proposed cuts. It is the right record for a vanity, island, backsplash, or any project where the layout affects the visible result.
2. What should be marked on a quartzite slab photo?
Mark every finished piece, sink and faucet opening, miter, edge return, seam, splash, and panel cutout. Include dimensions and orientation. The fabricator needs to understand what is visible, not only what will fit inside the slab boundary.
3. Can two Taj Mahal slabs look different in one project?
Yes. Natural slabs vary in movement and warmth. Compare full images side by side before allocating pieces. Use the closest related material for paired vanity tops or adjacent panels, and reserve more varied pieces for separate locations where the eye will not compare them directly.
4. Do I still need a physical sample after approving photos?
Yes, when finish, cabinet colour, or lighting matters. Photos establish slab layout. A physical sample helps the team judge touch, reflection, and how the material responds under the project's intended lights. Both records serve different purposes.
5. What should I do first if the slab delivered for cutting looks wrong?
Photograph the full slab, label, and concern, stop cutting, and contact the supplier with the original approval set. Compare the delivery against the full image and batch record before any alteration makes the condition harder to assess.
Quick-Reference Checklist for slab-photo approval
- Request one straight-on full-face image with scale reference.
- Mark every visible finished piece on the complete slab.
- Place openings, miters, seams, and returns before release.
- Compare all reserved slabs in the same image orientation.
- Match the slab layout to final cabinet and wall drawings.
- Save the photo, cutting list, and finish approval together.
Final Conclusion
I still enjoy a beautiful slab photo, but I trust it most when it has dimensions, arrows, cut lines, and a cabinet drawing beside it. That is where the stone stops being an abstract promise and begins to fit a real room. Don't ask me how I know, but the full image is nearly always more honest than the crop.
Taj Mahal quartzite slab photos give the team one calm moment to see the entire job before cutting makes every choice permanent. Here's what I'd do: approve the complete photo, layout, and batch range as one record, then keep it with the fabrication drawings. I would rather spend ten minutes reading a full slab than ask a KA UNITED project team to explain why the best part was cut away.

References
- Dimension Stone Design Manual, Natural Stone Institute.
- Natural Stone Care Guide, Natural Stone Institute.
- Kitchen and Bath Design Standards, National Kitchen and Bath Association.
- TCNA Handbook for Ceramic, Glass, and Stone Tile Installation, Tile Council of North America.
- ASTM C97 Standard Test Methods for Absorption and Bulk Specific Gravity of Dimension Stone, ASTM International.
- ASTM C615 Standard Specification for Granite Dimension Stone, ASTM International.
- Search Essentials and Creating Helpful, Reliable, People-First Content, Google Search Central.