Bathroom Vanity Faucet Hole Spacing: Single-Hole, Centerset, Widespread, Backsplash, And Service Access
Bathroom Vanity Faucet Hole Spacing: Single-Hole, Centerset, Widespread, Backsplash, and Service Access
Example: a hotel vanity mock-up receives the correct faucet model, but the three-hole pattern sits too close to the backsplash for the installer to tighten the rear mounting nuts. From above, everything looks centered. Below the top, the wrench has nowhere to turn. Bathroom vanity faucet hole spacing is therefore a service-access decision as much as a visual one.

My answer in the first meeting is direct: do not drill from a catalogue description. Get the final fixture model, manufacturer template, hole diameters, center-to-center dimensions, deck-thickness limits, and mounting hardware. Then overlay them on the sink, top, splash, cabinet rails, drawers, and plumbing zone.
Table of Contents
- Freeze the faucet model
- Read the drilling template
- Align faucet and sink
- Protect backsplash clearance
- Check hardware below
- Approve the mock-up
- Control production revisions
Freeze Bathroom Vanity Faucet Hole Spacing before Stone Cutting
Single-hole, centerset, and widespread describe families, not one universal drilling pattern. Two widespread faucets can use different hole diameters, valve spacing ranges, escutcheons, hose routes, and mounting hardware. I record the manufacturer, model, finish, revision, and approved template date beside the room type.
The Hotel Bathroom Vanity Packages: Complete Guide to Tops, Cabinets, Sinks, Sizes, and Project Coordination keeps the faucet inside the bathroom package. That matters because a fixture change can alter the stone, sink position, upper drawer, supply valves, backsplash, mirror, and maintenance method at once.
A double-sink quartz vanity top adds another question: are both faucet centerlines symmetrical to the cabinet modules, bowls, mirrors, and wall lights? I dimension each station rather than relying on a mirrored CAD block.
Use the current template, not a remembered dimension
I ask for the template supplied with the selected fixture or the manufacturer's current technical drawing. A marketing image is not a drilling record. If a PDF and a physical template disagree, the fixture supplier must resolve the discrepancy before release.
The vanity faucet drilling template should show hole centers, diameters, allowable spacing, orientation, mounting surface thickness, and any clearance circle for nuts or hoses. I add a scale note and verify one known dimension before using a printed sheet.
I archive the accepted vanity faucet drilling template with the fixture schedule so a later replacement order does not rely on an unlabeled paper pattern.
| Approval item | Top-view check | Below-deck check | Release evidence |
|---|---|---|---|
| Single-hole faucet | Centerline, hole diameter, escutcheon footprint | Mounting nut, hoses, stabilizing plate | Model-specific template and mock-up photo |
| Centerset set | Fixed center distance and base footprint | Shared or separate mounting hardware | Fixture drawing tied to room type |
| Widespread set | Valve centers, spout center, handle sweep | Hose reach, valve bodies, wrench access | Approved spacing within manufacturer range |
| Backsplash | Finished face to faucet body and handle | No hidden conflict at joint | Section through faucet and splash |
| Sink | Spout aimed into bowl and clear of rim | Cutout rail and clips clear hardware | Combined sink-faucet overlay |
| Cabinet | Visual alignment with doors and mirrors | Drawers, rails, plumbing, and service opening | Cabinet section with access envelope |
Align the Faucet with the Bowl, Not Just the Top
A faucet can sit on the top centerline and still miss the useful part of the bowl. I check where the water lands, how far the spout reaches, the basin slope, overflow location, and the distance to the front rim. The user's hands should not collide with the bowl wall during normal washing.
The published Vanity Sink Cutout and Drawer Clearance for Hotel Bathrooms covers the under-counter conflicts. Here the same section also carries bathroom vanity faucet hole spacing, because moving the faucet rearward may improve appearance while destroying wrench access or hose routing.
On a single-sink sintered stone vanity countertop, the approved fabrication method and fixture template control the drilling. Thin material, backing, reinforcement, and edge distances require the fabricator's method; the fixture installer should not improvise new holes on site.
Backsplash clearance must include handle movement
Faucet backsplash clearance is not measured only to the fixed spout. Some handles tilt backward, rotate toward the wall, or require room for an escutcheon and cleaning cloth. I operate the complete faucet through its full range on the mock-up.
A thick splash or forward-set wall lining can reduce usable deck depth after the top was drawn. I use the finished splash face, not the structural wall, as the reference. Sealant space and installation tolerance also stay visible in the section.
I record faucet backsplash clearance at the closest moving point, because the handle often reaches farther toward the wall than the fixed faucet body.
Wall-mounted faucets move drilling away from the top, but they add rough-in height, projection, wall build-up, access panel, bowl alignment, and splash testing. I do not treat them as a shortcut. They simply move the coordination work to a different plane.
The Hard-Won Lesson: The Holes Matched, but the Wrench Did Not Fit
Example: a three-hole layout matches the fixture drawing and looks balanced behind the basin. The mock-up installer reaches below and finds the rear valve nut trapped between the backsplash support and a cabinet rail. The hose can bend into place, but the nut cannot be tightened or removed without lifting the top. The team shifts the rail opening and records a service envelope before approving production.
The Lesson: Approve faucet drilling only after a person can install, tighten, inspect, and replace every fitting from below.
Protect Vanity Plumbing Access below the Deck
The space beneath the holes belongs to mounting nuts, stabilizing plates, supply hoses, mixing tees, sensors, batteries, and sometimes a drain pop-up rod. I draw that volume as an envelope rather than a few thin lines. The cabinet shop can then keep rails and drawers outside it.
Vanity plumbing access also needs a hand route. A component may technically fit yet remain impossible to replace after the basin and upper drawer are installed. I ask maintenance to remove the mock-up cartridge or hose using the planned access.
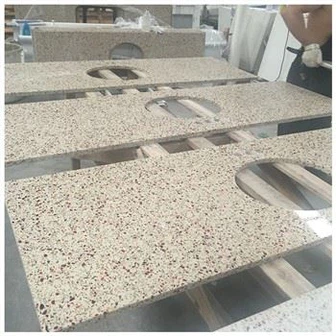
With a pure white quartz bathroom countertop, repeated holes can be fabricated consistently when the model and room code are controlled. Consistency does not rescue a wrong template, so the first-off piece still needs measurement before the production batch continues.

Check Mirrors, Lighting, and Wall Accessories
Faucet position affects the mirror composition and the practical cleaning zone. A tall spout may overlap a low mirror edge visually or make the lower frame hard to wipe. Side handles need space away from soap dispensers and wall outlets.
The Hotel Vanity Lighting Checklist before Bathroom Approval helps coordinate mirror and fixture alignment. I use that reflected elevation to catch a faucet that looks centered on the stone but off-center beneath a mirror panel.
The tap is a mechanical fitting, not a decorative dot. Its operation, maintenance, and connection geometry deserve the same attention as its finish. That is especially true across repeated hotel rooms where one awkward service detail multiplies.
Control the Template through Mock-Up and Production
I label the approved template with the faucet model, room type, top drawing revision, sink model, scale, and date. The file name carries the same identifiers. If procurement substitutes a finish code that keeps the same body, I still ask for written confirmation that the drilling and hardware remain unchanged.
Bathroom vanity faucet hole spacing appears on the signed top drawing and the inspection sheet. The first finished top is measured from stable datum lines, not from a rough edge. Hole diameters and centerlines are photographed with the measuring tool readable.
For double vanities, I compare left and right stations, but I also check the cabinet modules below. A shared centerline can cross a partition. The visual rhythm must agree with the service geometry.
The first-off report lists bathroom vanity faucet hole spacing by centerline and diameter, then identifies the exact fixture used for the fit test.
Where Faucet Coordination Usually Breaks Down
The common failures are late fixture substitution, scaled printouts, missing hole diameters, no handle-sweep test, and cabinet drawings that show plumbing as a generic rectangle. Each looks minor until the first installer reaches under the top.
Another problem is assuming the same faucet can serve every room type. Accessible rooms may use a different basin, reach, control, or clearance requirement. Suites may have thicker splashes or different mirrors. I keep bathroom vanity faucet hole spacing tied to the exact room schedule.
Any substitution sends bathroom vanity faucet hole spacing back through the overlay, even when the visible finish and general faucet style appear unchanged.
The Hotel Bathroom Vanity Packages: Complete Guide to Tops, Cabinets, Sinks, Sizes, and Project Coordination gives those variants one approval route. A faucet change is logged as a package change, so the stone and cabinet teams see it before drilling begins.
Final inspection checks bathroom vanity faucet hole spacing before protective film and packing hide the easiest measuring access.
Escalate any drilling conflict before installation
First, photograph the top, fixture label, template, and below-deck obstruction with dimensions. Second, do not enlarge holes or modify the cabinet until the responsible parties review the effect. Third, send the supplier the approved faucet data, top drawing, cabinet section, and first-off inspection record for comparison.
Frequently Asked Questions
1. How is bathroom vanity faucet hole spacing selected?
Use the exact faucet manufacturer's current template and technical drawing. Coordinate hole centers and diameters with the sink, backsplash, deck thickness, mounting hardware, cabinet rails, drawers, plumbing route, and service access before drilling.
2. Are all widespread faucet holes the same distance apart?
No. Widespread sets may allow a spacing range, but valve bodies, hoses, escutcheons, and handle movement vary. Record the selected center distance and prove the complete fixture on the mock-up.
3. How much space should remain behind a vanity faucet?
Use the fixture's operating envelope rather than one generic number. Leave room for the fixed body, full handle movement, backsplash joint, installation tolerance, and cleaning access. Measure from the finished splash face.
4. Why check faucet hardware against drawers?
Mounting nuts, hoses, sensor boxes, and supply valves occupy space below the deck. A drawer or cabinet rail can block installation and later repair even when the top view looks correct. Test access with the real hardware.
5. What should I do when the drilled holes do not match the approved faucet?
First, photograph the fixture label, template, holes, and dimensions. Second, stop installation and do not enlarge the openings. Third, compare the approved fixture schedule, top drawing, cabinet section, and inspection record with the supplier before choosing a correction.
Quick-Reference Checklist for Faucet Drilling
- Freeze the exact faucet manufacturer, model, finish, and revision.
- Verify template scale, hole diameters, centerlines, and deck limits.
- Overlay the spout outlet with the useful basin area.
- Test handle movement against the finished backsplash face.
- Draw mounting hardware, hoses, rails, drawers, and hand access below.
- Measure and photograph the first finished top before batch drilling.
Final Conclusion
Bathroom vanity faucet hole spacing is approved only when the exact fixture works above and below the deck. Freeze the model, verify the template, align the bowl, protect handle movement, and prove service access.
I would rather pause one drilling file at KA UNITED than ask an installer to turn an inaccessible nut behind a finished backsplash.

References
- Bathroom Planning Guidelines, National Kitchen and Bath Association.
- 2026 Bath Trends Report, National Kitchen and Bath Association.
- Dimension Stone Design Manual, Natural Stone Institute.
- ANSI A117.1 Accessible and Usable Buildings and Facilities, ICC.
- Plumbing Fixtures and Fixture Fittings Standards, ASME International.
- Cabinetry and Architectural Woodwork Standards, Architectural Woodwork Institute.
- Countertop, Wikipedia, Wikimedia Foundation.