Gray Quartz Vanity Top For Multi-Unit Bathrooms: Undertone, Cabinet Finish, And Room-to-Room Control
Gray Quartz Vanity Top for Multi-Unit Bathrooms: Undertone, Cabinet Finish, and Room-to-Room Control
A sample-room vanity can look finished until the drawer opens. Its back corner may touch the trap because the basin moved forward during stone detailing while the cabinet drawing kept the earlier sink position. The surface has no defect. The package has two correct drawings that describe two different bathrooms.

That near-miss captures the real work behind a gray quartz vanity top. Buyers often begin with color and slab thickness, yet daily performance depends on the quiet relationships underneath: where the cabinet carries the load, how the cutout weakens the top, whether a hand can reach the shutoff valves, and where water goes after housekeeping wipes the basin.
Choose quartz when repeatable appearance, low routine maintenance, and color control suit the project. Then approve it as part of a vanity package. A top that ignores the cabinet, sink, wall, light, and maintenance method is not ready for production.
Table of Contents
- Decide whether quartz fits the room program
- Approve the surface people will actually see
- Coordinate sink, faucet, cabinet, and plumbing geometry
- Plan thickness, edges, support, and wall fit
- Test cleaning and replacement records
- Answer project questions
Use the Gray Quartz Vanity Top to Set the Bathroom Undertone
Gray is not one neutral. Some products lean blue, some carry green, and others move toward taupe or beige. The effect becomes clear only beside the cabinet, basin, wall tile, metal finish, and sealant. A sample viewed alone can look balanced while the installed room makes its undertone obvious.
I begin with the fixed room materials. If the wall tile and ceramic basin are already selected, the gray quartz vanity top must make sense beside them under the actual mirror light. If the quartz is the design anchor, then cabinet paint and grout are judged against its approved physical reference.
The Hotel Bathroom Vanity Packages Complete Guide keeps that palette tied to room schedules, dimensions, basins, plumbing, cabinet construction, installation, cleaning, and handover. Color approval does not sit outside the package.
Compare horizontal and vertical surfaces
Place the top sample flat and the backsplash sample upright. Light strikes them at different angles, so the same gray can look darker on the horizontal face and cooler on the vertical splash. Add the cabinet door vertically beneath the actual edge profile. This simple arrangement catches more than a row of loose chips.
Approve Undertone, Pattern, and Finish under Room Light
Use the planned 3000K or 4000K source, but do not rely on color temperature alone. Lamp spectrum, color rendering, output, diffuser, placement, surrounding finishes, and daylight all affect what the eye sees. Test the normal guest setting and any brighter housekeeping setting.
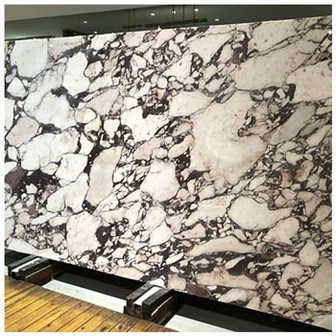
A fine particulate gray behaves differently from a broad marble-look pattern. The first may read as an even field until close range. The second needs a cut layout around sinks and seams. Current full-slab or full-pattern images are therefore part of the gray quartz vanity top approval whenever movement is visible.
| Gray behavior | Likely room influence | Comparison needed | Record |
|---|---|---|---|
| Cool blue-gray | Sharper beside warm timber | Cabinet door and 3000K light | Accepted contrast photograph |
| Warm taupe-gray | May look beige beside cool white | Basin, wall tile, and grout | Signed material board |
| Green-gray | Can intensify near certain paints | Full cabinet finish set | Mock-up under final lamps |
| Marble-look gray | Pattern dominates long tops | Sink overlay and seam layout | Numbered slab cut map |
Photograph the set from the doorway and mirror position, then include a close edge view. Keep camera exposure stable where possible and include the signed sample. A phone image can document relationships; it cannot guarantee that two screens display the same gray.
The Hard-Won Lesson: Approve gray beside every fixed finish
A cool gray chip can look calm on a white desk. Beneath a warm oak cabinet front and a 3000K mirror lamp, the same surface reads noticeably blue while the grout shifts cream. Nothing is defective. The isolated sample never represented the room.
The Lesson: Sign the complete material relationship under the operating light, not a lone gray chip.
Keep Color Approval Connected to Sink and Cabinet Geometry
The basin interrupts the surface and becomes the strongest light reference. Use its final cutout template, rim or reveal, faucet position, overflow, and drain. Then overlay cabinet rails, partitions, drawers, clips, valves, and trap. The selected surface cannot rescue two drawings that place the sink differently.
A gray quartz vanity top on a narrow cabinet may leave small front and rear bridges after an undermount opening. A long double vanity adds another basin, a center bridge, more hardware, and possible support requirements. The geometry determines whether a seam or pattern shift lands in a visible place.
The bathroom vanity top range supplies current surface options. The bathroom cabinet range supplies the structure, storage, and access context. Review each for its own role, then combine them on the room drawing.
Check drawer travel with the trap and shutoff valves installed. Check faucet handles against the splash and mirror. Confirm that sealant joints can be tooled and cleaned. Guests see the color first, but operators remember the drawer that never opened fully.
Set Edge Thickness, Support, and Wall Fit before the First Piece
Visible edge thickness affects the room. A thin edge can feel crisp beside a slim cabinet rail; a built-up edge adds visual weight and another pattern joint. The chosen detail must suit the slab, sink opening, span, exposed ends, handling, and support.
The quartz vanity top thickness guide separates nominal slab thickness from the finished edge appearance and support detail. Apply that section to the selected gray material before releasing edge strips or miter work.
Walls add another variable. State the allowable joint, scribe method, side-splash return, and field-adjustment edge. A dark shadow at a widening wall gap can make a neutral top look poorly matched even when the color is correct.
Approve one completed top on its cabinet. Check bearing, level, sink support, front projection, overhang, splash, joint color, drawer clearance, plumbing access, edge feel, and room light. The mock-up is where color and construction stop being separate documents.
Test Gray Finish, Cleaner, and Future Replacement
Gray can hide light dust better than black and disguise some minor water marks better than pure white, but the actual finish controls the result. Test the approved cleaner, dilution, cloth, rinse, and dry wipe. Inspect for residue, changed sheen, or film under the mirror light.
Engineered quartz care follows the selected manufacturer's instructions. Do not assume that one brand's chemical limits, heat guidance, or repair method applies to another. Keep those instructions with the room handover and train staff before opening.
For repeated rooms, record product code, finish, sample, slab or lot identifiers where available, first-piece result, room allocation, and spares. A later gray quartz vanity top replacement may not match an earlier lot exactly. The operator needs evidence for a fair comparison and a plan for visually connected rooms.

If several rooms appear different, photograph complete clean vanities under the same operating light. Record room type, lot, cabinet finish, lamp, sealant, cleaning condition, and installation date. Stop polishing or chemical experiments. Compare the signed board and first-piece record before involving the supplier.
Zone the room schedule when one gray cannot do every job
A project may use the same nominal gray across standard rooms, suites, accessible rooms, and public washrooms, yet those spaces do not share the same light or cabinet. Before demanding one answer, group rooms by the conditions that materially change the surface: cabinet finish, daylight, mirror lamp, exposed side, top length, splash area, and basin count.
Where the conditions differ strongly, approve a separate working mock-up or define an accepted relationship for that group. This does not mean creating unnecessary color codes. It means acknowledging that a taupe-gray top beneath walnut and warm light will not read like the same top above a cool painted cabinet in a windowless public washroom.
Keep the same product and finish where standardization has operational value, but do not use standardization to erase observable differences. The room schedule can record one material code and several approved visual conditions. That record is much more useful than a blanket statement that all rooms must look identical.
Make Cabinet Finish and Joint Color Work with Gray
Cabinet fronts occupy more vertical area than the vanity top, so they often control the room's perceived warmth. White paint with a blue cast can make neutral quartz appear beige. Oak can make the same surface feel cooler. Dark walnut may reduce attention to undertone but make a pale sealant joint much more visible.
Place the real cabinet sample below the actual edge. Include the exposed side, because a laminate edge band or painted return may differ from the front face. Check handle finish and shadow. A long horizontal pull can reflect a cool line across a warmer gray field.
Joint color deserves its own sample. Test the sink sealant, backsplash joint, side return, and any seam adhesive after curing. A bright white line can break an otherwise quiet palette. A dark gray line may exaggerate a widening wall joint. Clear material can reveal an inconsistent substrate or collect a darker edge.
Ask the installer to produce the agreed joint width and tooling on the mock-up. Color approval without joint geometry is incomplete. The same sealant can look neat at three millimeters and heavy at eight, especially where a bowed wall opens behind the splash.
Use Real Bathroom Scenes to Challenge the Selection
In the morning scene, the mirror light is on, water sits near the faucet, and a guest places cosmetics on the dry working area. Look for glare, shadow, contrast, and practical landing space. The gray should support the room without hiding a joint or making the basin edge difficult to read.
During housekeeping, the light may be brighter and the drawer may remain open while staff clean around the trap and supplies. Check whether the edge shows residue, whether the faucet gap accepts a cloth, and whether cabinet rails or hardware block inspection. Surface color does not solve poor access.
During maintenance, a replacement faucet, sink clip, valve, or trap may require tools below the top. Confirm the access path before the cabinet goes into repeated production. If a technician must loosen the stone or remove a fixed shelf for ordinary service, the package needs redesign.
Finally, view an empty clean room from the corridor. Compare several approved rooms under their normal light. The purpose is not to search for microscopic difference. It is to confirm that the gray quartz vanity top remains inside the intended visual range and that no lot, cabinet, lamp, or joint creates an obvious outlier.
Quick-Reference Checklist for Gray Quartz Approval
- Compare the gray surface with the actual basin, cabinet, tile, grout, metal, and sealant.
- View horizontal and vertical samples under normal and cleaning light scenes.
- Record undertone, pattern, sheen, edge, seam, and accepted room relationship.
- Overlay sink, faucet, rails, drawers, plumbing, support, and wall tolerance.
- Test the specified cleaning cycle and inspect the fully dried result.
- Keep lot, room, first-piece, spare, and replacement records through handover.
Where the Gray Decision Becomes Reliable
The choice becomes reliable when another person can reproduce the comparison. They have the signed material board, known light, full-pattern evidence, room drawing, first-piece record, cleaning method, and lot information. "Neutral gray" is no longer a mood; it is an approved relationship with boundaries.
The parent Quartz Vanity Tops for Hotel and Multi-Unit Bathrooms carries that relationship through production and service. I would rather settle a blue or beige undertone in one mock-up than explain it across a corridor of finished rooms.
Frequently Asked Questions
1. Is a gray quartz vanity top suitable for hotel bathrooms?
Yes, when the project approves the current color range, sink and faucet geometry, cabinet support, wall tolerance, cleaner, heat protection, installation method, and replacement records. Hotel suitability depends on the whole package, not the material label alone.
2. Does quartz need to be sealed in a bathroom?
Engineered quartz generally does not follow the same routine sealing practice as many natural stones. Follow the specific manufacturer's care instructions, test approved cleaners, and pay attention to sink, backsplash, and wall sealant joints, which have their own maintenance needs.
3. What thickness works best for a hotel vanity top?
There is no universal thickness. The answer depends on sink opening, span, edge appearance, cabinet rails, overhang, support, faucet hardware, shipping, and local design requirements. Draw the section and test a first piece rather than choosing from appearance alone.
4. Can every room use the same top dimensions?
Only when verified room dimensions fall within the project's agreed tolerance. Trapped tops, bowed walls, tiled returns, accessible rooms, suites, and unusual plumbing may need separate room codes or field templates. Standardization works after exceptions are identified.
5. What should the site team do when a top does not fit?
Photograph the entire vanity and measured gap, record the room and piece codes, and stop cutting or installation on affected units. Compare the site dimensions, approved drawing, first-piece record, and wall-tolerance plan, then contact the supplier with the original evidence before modifying stone or cabinetry.
Final Conclusion
A gray quartz vanity top becomes a reliable hotel or multi-unit choice when repeatable appearance is backed by coordinated sink geometry, cabinet support, wall tolerance, lighting approval, cleaning tests, and room-coded records. Here's what I'd do: approve one complete working vanity, keep the evidence, and release repeated production only when every drawing describes the same bathroom; that is how KA UNITED keeps a good surface from becoming a site problem.
References
- Kitchen & Bathroom Planning Guidelines, National Kitchen & Bath Association.
- ANSI A161.1 Performance and Construction Standard for Kitchen and Vanity Cabinets, KCMA.
- Engineered Stone Countertop Guidance, International Surface Fabricators Association.
- Bathroom Planning Guidelines, National Kitchen & Bath Association.
- Sealant, Sink, and Faucet Manufacturer Installation Instructions for the Specified Products.
- Quartz Surface Care and Maintenance Guidance for the Selected Manufacturer.
- Engineered stone, Wikipedia, English edition.