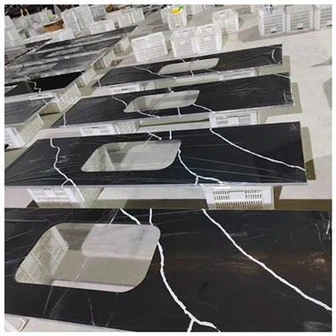
72 Inch Quartz Vanity Top For Single Or Double Sink Hotel Bathrooms
72 Inch Quartz Vanity Top: Single or Double Sink, Support, and Cabinet Layout
A double vanity can look generous from the doorway and still work badly at arm's reach. Basins placed too near the center leave one cramped shared landing area while broad outer corners serve no one. Two traps can also consume the cabinet's best drawers. The width is correct. The layout is not.

A 72 inch quartz vanity top gives a project team room to make good decisions and enough room to hide bad ones. Two sinks do not automatically create a better bathroom. One sink does not automatically waste space. The right arrangement follows occupancy, room type, plumbing, storage, housekeeping, accessibility, and the way the vanity meets the wall.
My first answer is simple: decide what the room needs before drawing two circles on a long rectangle. Then coordinate the top and cabinet from the same centerlines. This avoids the familiar pain in the neck of moving plumbing after drawers, rails, and stone openings have already been released.
Table of Contents
- Choose one or two sinks from the room program
- Set basin and faucet centerlines
- Protect drawers, rails, and plumbing access
- Plan openings, support, seams, and handling
- Approve the full-size package
- Answer long-vanity questions
Choose the 72 Inch Quartz Vanity Top from the Room Program
A seventy-two-inch nominal vanity may serve a hotel suite, primary residence bathroom, shared apartment room, accessible unit, or public wash area. Those users do not need the same top. The room schedule identifies who uses it, whether use is simultaneous, how much personal storage matters, and which cleaning or maintenance team will service it.
Two basins can make sense when two occupants regularly prepare at the same time and the room has matching mirror, lighting, and plumbing zones. A single basin can be more useful when one generous grooming area, seated position, storage bank, or uninterrupted landing surface matters more. An offset basin can preserve one large dry zone without making the cabinet feel empty.
The 72 inch quartz vanity top should be drawn by finished size, not assumed from the cabinet label. Wall-to-wall installation, open ends, fillers, side splashes, overhangs, and finished wall material all change the actual top. A cabinet called "72 inch" may need a wider or narrower stone piece depending on the package detail.
I use the Hotel Bathroom Vanity Packages Complete Guide to keep that decision tied to room schedules, cabinets, tops, sinks, plumbing, mock-ups, installation, testing, and handover. Long-vanity geometry is one branch of the package, not a separate purchase.
Measure useful space, not empty inches
Useful landing space sits where a hand can reach it without crossing a wet bowl. For two basins, check the clear surface between rims, the outer landing zones, faucet handles, soap placement, tissue boxes, and housekeeping access. A broad middle zone may look balanced but become wet if both faucets splash toward it.
For one basin, decide whether it is centered on the top, centered on a cabinet bay, aligned with the mirror, or offset to create storage. An asymmetrical plan needs intentional drawer widths and wall composition. It should not look like the basin moved because a pipe was discovered late.
Accessibility can change height, knee clearance, basin depth, pipe protection, faucet reach, and mirror position. Follow the applicable code and project accessibility consultant. Do not force an accessible room into the same cabinet and top simply because the overall width is available.
| Layout | What it gives the user | Cabinet and plumbing effect | Approval question |
|---|---|---|---|
| One centered basin | Equal landing zones and simple mirror alignment | One wet bay; broad drawer or door options at both sides | Does the center basin justify the lost middle storage? |
| One offset basin | One large dry working area | Asymmetrical drawer and plumbing zones | Do mirror, light, faucet, and cabinet bays share the same intent? |
| Two basins | Simultaneous use and separate wet zones | Two traps, fewer full-depth drawers, more cutout-sensitive stone | Is the clear space between bowls actually comfortable? |
| Accessible open bay | Required approach and knee space where applicable | Protected plumbing and revised support strategy | Has the accessibility consultant approved the complete assembly? |
Set Basin, Faucet, Mirror, and Light Centerlines Together
A 72 inch quartz vanity top needs a dimensioned centerline plan. It shows finished top edges, basin centers, cutouts, faucet holes, mirror centers, lights, wall outlets, cabinet partitions, drawer boxes, drains, shutoff valves, and traps. Every dimension references one agreed datum.
For two sinks, start with actual basin outside dimensions and manufacturer templates. Then establish the minimum clear stone at both ends and the desired surface between bowls. Check faucet body width, handle sweep, spout reach, overflow position, and the space needed to clean around each rim.
A common drawing error dimensions both sink centers from opposite ends without controlling the middle distance. Small changes in overall top width can then make the pair drift. Another error centers basins on cabinet doors while the mirrors are centered on wall panels. Both systems look correct separately and slightly wrong together.
Here's what I'd do: issue one elevation and one plan that show every centerline. Put the top, cabinet, mirror, light, outlet, sink, faucet, and plumbing on those sheets. A note saying "center as shown" is not enough when several trades are preparing separate shop drawings.
Check the space a person occupies
Stand at each proposed basin in the mock-up. Open adjacent drawers and doors. Reach the faucet. Place toiletries where a guest would leave them. Check whether the two users would crowd one another at elbows or mirrors. The top may be long, but the practical station width can still feel narrow.
Then clean it. Wipe between the faucets, around the basin rims, along the backsplash joint, and at the outside corners. A tight middle strip between two bowls can collect water and soap while being awkward for housekeeping to reach. The layout needs to work at 7 a.m. and during room turnover.
The Hard-Won Lesson: Freeze the sink model before fixing the cabinet bays
A drawing can reserve two sink centers yet still fail when the selected bowls become deeper or wider. The new cutouts move toward the cabinet partitions, the traps enter drawer space, and the narrow quartz bridge between the basins shrinks. Moving only the stone openings does not solve the package. The mirrors, faucets, rails, doors, and plumbing all inherit the change.
The Lesson: Do not release cabinet or stone production until the exact basin and its current template are part of the same approved drawing.
Protect Drawer Storage, Rails, and Plumbing Access
Two basins can consume two cabinet bays, but they do not need to destroy useful storage. The cabinet designer can use doors, U-shaped drawers, reduced-depth drawers, side banks, removable backs, or a planned central storage zone. The right choice depends on trap geometry, shutoff locations, supply hoses, overflow paths, and service access.
The bathroom cabinet range becomes relevant only after these internal zones are drawn. A beautiful front elevation can hide a rail through a drain center or a deep drawer behind a shutoff valve. Open every component in the sample room and verify the real hardware travel.

The cabinet top rail also affects stone support. A narrow rail can disappear where two sink openings remove much of the surrounding top. A broad rail may block basin clips. Partitions can provide bearing but conflict with plumbing. The cabinet and fabricator decide the bearing lines before drilling begins.
The published Bathroom Vanity Plumbing Rough-In guide explains drain centers, shutoff valves, trap space, and drawer clearance. For a double station, duplicate the discipline for each basin and verify that the two systems do not compete for one service opening.
Keep future service possible
A hotel operator will eventually replace a faucet cartridge, trap, valve, sink fastener, or drawer slide. The hand needs room to work without removing the whole top. Removable backs and labeled access panels help, but they must still leave the cabinet stable.
Do not bury electrical boxes, transformers, or power modules behind fixed plumbing. When integrated outlets or powered drawers appear, coordinate them with wet zones and applicable electrical rules. Service access is part of the room package, not a maintenance team's future improvisation.
Plan Quartz Openings, Support, Seams, and Handling
Every sink opening reduces the continuous material around it. Two openings create more narrow rails and more internal corners. The 72 inch quartz vanity top drawing should show cutout corner radii, front and rear widths, basin supports, faucet holes, edge section, backsplash, joints, overhangs, and cabinet bearing.
Whether one piece is practical depends on slab size, room access, weight, crate design, stair or elevator limits, handling route, and the finished openings. An uncontrolled seam placed through a faucet, basin edge, or strong vein is a failure.
If a seam is required, choose its location before production and coordinate it with cabinet support. Define alignment, width expectation, adhesive color, surface level, and pattern relationship. Keep the joint accessible enough for installation while away from standing water where possible.
The Bathroom Vanity Countertop Support article provides the separate support path for openings, long spans, rails, and brackets. A long top with two sinks deserves that review even when the nominal overhang appears modest.
Thickness changes the visual weight and handling. The approved Quartz Vanity Top Thickness for Hotel Bathrooms reference explains the relationship among slab thickness, built-up edges, faucet hardware, sink openings, support, and cabinet geometry.
Use wall tolerance deliberately
A trapped top between two walls needs reliable finished dimensions. Measure after relevant wall finishes are complete or define the project stage precisely. Record out-of-square corners, bowed walls, tile buildup, and room exceptions. Decide whether the top, splash, filler, or joint absorbs variation.
Oversizing every top is not a tolerance strategy. It creates uncontrolled site cutting around two vulnerable openings. Undersizing every top produces thick sealant. Room-type standardization works only after the project separates ordinary variation from true exceptions.
A long backsplash needs its own handling and joint plan. Full-height material changes outlet, mirror, and light coordination. A short splash still needs consistent height, finished ends, faucet clearance, and a clean transition at side walls. Water will find the careless corner. Don't ask me how I know.
Approve the Full-Size Seventy-Two-Inch Package
A small material sample cannot approve a long top. The mock-up needs the intended cabinet width, sinks, faucets, hardware, top thickness, edge, backsplash, mirrors, lights, wall finish, and plumbing. It should operate under the expected room light and at the finished mounting height.
For a 72 inch quartz vanity top, the first-piece record shows overall dimensions, both opening locations, faucet drilling, edge, surface, backsplash, support points, cabinet alignment, and visible repairs. Measurement photographs show the tool, datum, and reading. General beauty shots do not replace them.
Run water at both stations. Look for splash overlap, ponding, weak sealant geometry, drain behavior, and water reaching drawer fronts. Open every drawer while both traps and hoses are installed. Check that the mirror and light centers agree with the basins when viewed from the doorway.
Carry the top through the planned installation route or verify a realistic handling simulation. Protect narrow bridges and exposed corners. Mark lifting restrictions on the crate and piece. The room code follows the top, sinks, splashes, and cabinet so components do not drift between similar suites.
If the installed top does not fit, photograph the complete vanity, measure the gaps from the approved datum, and stop cutting affected pieces. Compare room dimensions, drawing revision, first-piece record, and cabinet position. Contact the supplier with those records before trimming stone or moving cabinetry. Thank goodness for boring documentation when a long finished surface is already upstairs.
Quick-Reference Checklist for a 72-Inch Vanity
- Choose one, two, or offset basins from the room program and simultaneous-use requirement.
- Freeze exact sink templates before fixing cabinet bays, drains, mirrors, and lights.
- Dimension basin centers, clear landing zones, faucet reach, and cleaning access from one datum.
- Overlay traps, valves, drawers, partitions, rails, sink clips, and service hand space.
- Draw narrow stone rails, cutout radii, edge sections, seams, bearing, and backsplash joints.
- Verify wall tolerances and the installation route before quantity production.
- Run water and operate the complete sample-room assembly before release.
How to Make the Long Vanity Feel Deliberate
Why two sinks can make the room worse
Two bowls can reduce useful storage, create cramped middle space, add plumbing, weaken more of the top, and increase cleaning time. They earn their place only when simultaneous use and room planning justify those costs. A single basin with better landing space may feel more generous.
What the drawings must settle
The approved set settles top size, openings, centerlines, cabinet bays, drawer envelopes, plumbing, support, edge, splashes, joints, wall tolerance, mirror and light alignment, handling, and room codes. Any later change triggers a coordinated revision, not a note sent to one trade.
Frequently Asked Questions
1. Should a 72 inch quartz vanity top have one sink or two?
Use two when simultaneous use, mirror and light planning, plumbing, storage, cleaning, and clear space between bowls all work. Use one when broad landing space, larger drawers, accessibility, or a quieter composition gives the room more value.
2. How far apart should two vanity sinks be?
No single dimension fits every sink. Begin with the actual bowl outside dimensions and templates, then set comfortable clear surface between rims, outer landing zones, faucet operation, user elbow room, mirror centers, and cleaning access. Follow applicable codes and project standards.
3. Does a seventy-two-inch top always need a seam?
No. Slab size, opening layout, pattern, weight, transport, room access, and handling route determine whether one piece is practical. When a seam is needed, coordinate its location, support, alignment, adhesive, level, and pattern before fabrication.
4. What support does a double-sink quartz top need?
Support depends on thickness, cutout geometry, spans, overhangs, cabinet rails, partitions, and manufacturer or engineering requirements. Overlay the openings on the cabinet and place bearing where it does not block sink fasteners or plumbing access.
5. What should happen if one room is narrower than the standard top?
Photograph and measure the room from the agreed datum, identify the room code, and pause installation. Compare the result with the approved tolerance plan and drawing. Contact the supplier before site cutting so the team can decide whether the top, splash, filler, cabinet, or room condition needs correction.
Final Conclusion
A 72 inch quartz vanity top succeeds when the number of sinks follows the room program and every centerline agrees across stone, cabinets, plumbing, mirrors, and lights. Here's what I'd do: test the full-size assembly with real users and real cleaning motions before repeating it, because KA UNITED would rather move a sink on paper than repair a long finished vanity on site.
References
- Kitchen & Bathroom Planning Guidelines, National Kitchen & Bath Association.
- 2026 Bath Trends Report, National Kitchen & Bath Association.
- ADA Standards for Accessible Design, U.S. Department of Justice.
- Dimension Stone Design Manual, Natural Stone Institute.
- Architectural Woodwork Standards, Architectural Woodwork Institute.
- Plumbing Fixture and Fitting Standards, ASME.
- Vanity, Wikipedia, English edition.