Bathroom Vanity Sink Centering: Basin Offset, Drawer Layout, And Faucet Reach
Bathroom Vanity Sink Centering: Basin Offset, Drawer Layout, and Faucet Reach
At a hotel mock-up, a basin can sit exactly on the mirror line and still leave the room wrong. I have seen a top look beautifully balanced from the door, with two equal drawers drawn below it. Then the trap and supply valves arrived. The center drawer became a shallow strip, the back of the cabinet became hard to clean, and the plumber had no good place to work. Nobody had chosen a bad bowl. The drawings simply stopped one layer too early.
That is why I start bathroom vanity sink centering with the person standing at the vanity, not with the cabinet midpoint. Where do their hands fall? Where does the water land? Which drawer needs to open? How does the trap move behind it? Do not ask me how I know, but a finished basin can hide a very expensive argument below the top.

A centered bowl is often the right answer. It is not always the useful answer. In a standard guestroom, a centered layout may support a repeatable mirror and light arrangement. In an accessible room, a side wall, knee space, or faucet reach can change the logic. In a suite, a double-basin top may need two independent work zones rather than a visually neat pair of circles. This is where you do not cheap out. The line must work for the room, not merely for the elevation.
Table of Contents
- Start with the person, the wall datum, and the cabinet interior
- Overlay the bowl, drain, faucet, and drawer construction
- Use the mock-up to approve cleaning and service space
Start with the person, not the midpoint
The visual middle of a vanity comes from a drawing convention. The usable middle comes from the bathroom itself. I first mark the finished side walls, door swing, mirror center, and the standing position in front of the top. Then I put the selected basin on that layout. A basin that is technically centered on a 1200 mm cabinet can still feel too close to a return wall if the person using it stands slightly off-axis because of the door or towel bar.
That first walk-through gives bathroom vanity sink centering a useful test: the user should not need to step sideways just to use a basin that happens to align with a drawing line.
The same point applies to a double basin. Equal space between the two bowls looks disciplined in a plan, but it does not automatically create two comfortable stations. Each user needs a place for their hands, a faucet control that does not collide with the bowl rim, and some dry deck area. When the top is crowded, the gap between bowls can become a decorative strip that nobody uses while both users fight the outside edges.
I also ask how the room will be cleaned. A good bathroom detail leaves a wipeable path around the faucet base, along the splash, and at the bowl edge. If a basin is pushed to one side only to make a cabinet elevation look unusual, housekeeping may inherit a narrow wet corner behind it. Thank goodness this is easy to see on a physical mock-up. It is much harder to correct after the mirror and top are installed.
Bathroom vanity sink centering needs one complete overlay
The top drawing alone is not enough. I want a single overlay that includes the wall datum, finished top edge, bowl cutout, drain center, faucet center, cabinet rails, drawer boxes, trap, shutoff valves, and backsplash. Each trade may have a reasonable drawing of its own. The trouble begins when none of those drawings shows the others.
The drain is usually the first below-deck conflict. A bowl can leave plenty of material at the front edge and still place the drain directly through a rail or the deepest drawer. A shaped upper drawer, a false front, or a reduced drawer depth may be perfectly sensible. The team just needs to state that choice clearly. It should not appear later as an unpleasant surprise in a finished room.
Faucet placement belongs on the same overlay. A faucet can be centered over the bowl while its mounting hardware conflicts with a rear rail, a backsplash return, or the available wrench path. I do not assume that a generic fixture symbol tells us enough. The approved model and its current technical template must be the reference. A small change in the fixture can move the mounting requirements and reopen the whole arrangement.
Use a stable datum
Measure the bowl, drain, and faucet from a finished wall datum or another fixed reference that every trade can locate. Do not measure a critical center from a rough stone edge or a cabinet face that may shift during installation. The written record should tell a later installer exactly where the first measurement started. If it cannot do that, it is a sketch, not an approval record.
With bathroom vanity sink centering, a shared datum prevents a top template and a cabinet drawing from quietly using different middle points.
Give room types separate overlays
A standard king room, an accessible room, and a larger suite may share cabinet finishes but not geometry. I would not allow one signed layout to cover all three unless every condition is truly identical. The room schedule should name the bowl model, top length, splash arrangement, drawer construction, and service conditions for each variation. It prevents a familiar-looking room from receiving the wrong cabinet interior.
Where drawers and plumbing compete for the same space
Cabinet storage is often discussed as a front-elevation issue. In practice, it is a plumbing issue as well. A shallow upper drawer can work around a trap. A deeper lower drawer may avoid the supply lines. A fixed false front can simplify the cabinet. None of those answers is automatically better. The right answer depends on what the room needs to store and how the services enter the wall.
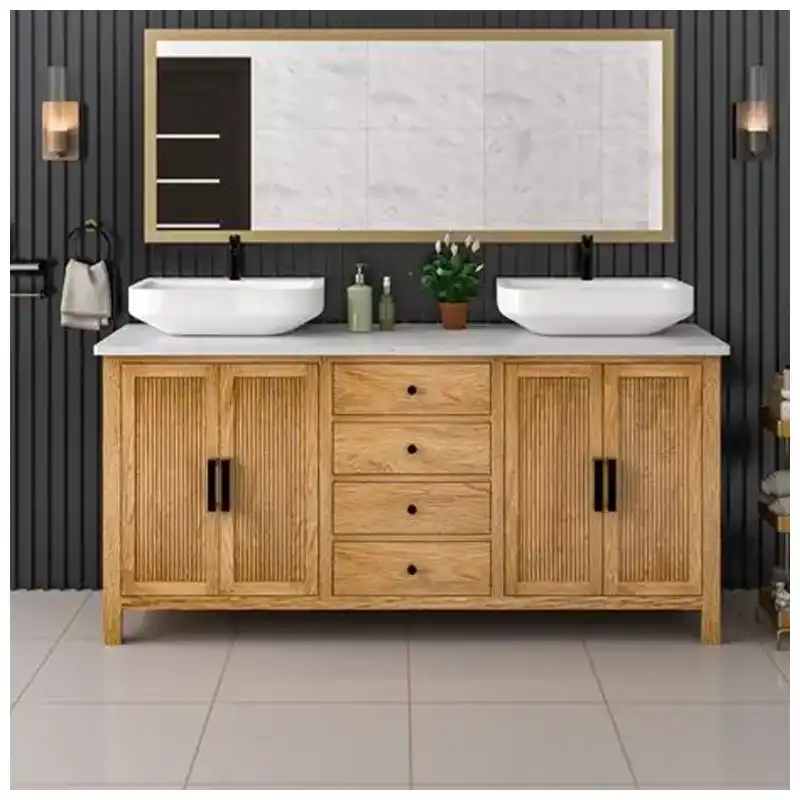
With a vanity basin offset, the cabinet may recover useful full-depth storage on one side. That can be a good trade when a guest needs a more practical drawer and the room has enough clear approach space. It can also create a strange relationship with the mirror or faucet if the offset was chosen only to protect one drawer. I want to see the full composition from the front and the full cabinet section from below.
For a long top with one basin, the empty side does not have to be wasted. It may become a landing zone, an accessible counter area, or a location for drawers that stay clear of the trap. The decision should be intentional. A wide, unused stone field next to a crowded drawer stack usually tells me the bowl, cabinet, and plumbing were designed in separate conversations.
False fronts are not a failure
A false front becomes a problem only when someone promises it as storage. I have seen neat cabinet elevations with three drawer lines, followed by a deep trap that makes the top drawer impossible. A well-drawn false front can preserve the appearance of the cabinet while allowing an honest, practical storage layout below. The cut sheet must show it, and the client team must see it in the mock-up.
Service access should remain visible
A drawer that opens when the cabinet is empty may not open with a trap, valves, flexible hoses, and mounting hardware in place. During first-unit approval, open every moving part with the actual services installed. This is where you do not cheap out. A hotel does not want to remove a finished drawer front just to reach an ordinary valve or replace a flexible hose.
For bathroom vanity sink centering, that below-deck test is part of the approval itself. A bowl position has not earned release until the cabinet can be opened, cleaned, and serviced with the real plumbing in place.
Choose the top after the layout earns it
Once the bowl, faucet, and cabinet interior agree, the fabricator can place the cutout on quartz bathroom vanity tops with a clearer purpose. The material around the opening should have enough room for the selected edge treatment, the basin clips, and the normal movement of the cabinet below. I prefer to settle the geometry first, then let the top drawing show the calmest and most durable cutout position.
An integrated basin changes the conversation because the bowl, drain fall, rim, and top are one visible object. Late changes to the centerline may require a new top rather than a small drilling revision. A vessel basin creates a different set of questions: the top opening may be small, but the faucet height, spout projection, and rear-deck space need closer attention. In both cases, the same overlay remains useful.
Material pattern matters after the functional layout is approved. I would rather move a printed vein slightly than move a basin into a poor service position. A beautiful surface should make the finished room feel composed. It should not be asked to disguise a cabinet or plumbing decision that belongs in the drawings.
Bathroom vanity sink centering earns its place only after that practical agreement exists above and below the counter.
What to show on the first approved room
Photographs are only useful when they answer a later question. I ask for one image from the front with the mirror and basin visible, one from below with the trap and supply valves fitted, one with every drawer open, and one that shows the faucet mounting area. Each photograph should identify the room type and date. If a later issue appears, the team has evidence rather than a memory.
The approval sheet should name the basin, faucet, cabinet code, top thickness, drawer configuration, and relevant wall datum. It should also state what changes require the layout to be reopened. A changed bowl, a different faucet, a new drain location, or a revised cabinet rail may look minor in a procurement list. Each can affect the final result.
Keep the first unit long enough to test it. Let the plumber reach the valves. Let the cleaner wipe the rear deck. Let the cabinet installer open the drawers. Let the designer stand in front of the mirror. This is not theatre. It is the quickest way to learn whether bathroom vanity sink centering supports ordinary use before the decision is repeated hundreds of times.
The same first unit also gives the project team a fair way to settle bathroom vanity sink centering when drawings seem plausible but the room feels tight. I would trust a basin, faucet, trap, and drawer working together over another round of isolated mark-ups.
What the approval table needs to settle
| Decision point | What the overlay must show | What fails when it is missed |
|---|---|---|
| Basin center | Wall datum, mirror line, and user standing zone | A bowl that looks centered but crowds a wall or pull |
| Drain route | Drain center against rails, drawers, and trap space | A drawer box that must be cut after fabrication |
| Faucet position | Fixture template, splash depth, and handle movement | Poor water landing or inaccessible mounting hardware |
| Cabinet storage | True drawer depths after plumbing is fitted | Promised storage that cannot be used |
| Room type | A separate overlay for each nonstandard bathroom | A copied layout that fails in a suite or accessible room |
The Hard-Won Lesson: Never approve symmetry before service space
A project team once treated the basin centerline as the only non-negotiable feature of a guestroom vanity. The finished drawer stack had to stop short of the trap, leaving the deepest storage where no guest could use it. The top did not need replacing, but the cabinet schedule and handover did. The drawing showed the bowl and the cabinet face. It did not show the drawer interior with plumbing fitted.
The correction was not another prettier elevation. It was a bathroom vanity sink centering overlay that showed the drain, trap, rails, and drawer volume together.
The Lesson: Approve the cabinet with the trap in place, not with empty space behind the doors.
Reading bathroom vanity sink centering as a finished-room decision
One centerline rarely acts alone
A bathroom holds several competing lines: wall, mirror, light, basin, drain, faucet, cabinet pull, and tile joint. The stronger arrangement makes the important lines deliberate while leaving room for normal use. The parent Hotel Bathroom Vanity Packages Complete Guide is useful when the team needs to compare this layout decision with the wider room package.
Countertop strength remains a separate check
A cutout can be well placed for drawers and still need appropriate support around a long span or narrow front rail. When the top changes thickness, edge, or basin size, read that question with Bathroom Vanity Countertop Support: Sink Cutouts, Long Spans, Cabinet Rails, and Brackets before the fabrication detail is frozen.
Plumbing must follow the signed geometry
When a room changes after rough-in, document the condition with photographs, stop repeated installation, and compare the actual drain and valve positions with the signed overlay. The next check belongs with Bathroom Vanity Plumbing Rough-In: Drain Center, Shutoff Valves, Trap Space, and Drawer Clearance, not with an improvised site adjustment.
Questions project teams ask before release
1. How do I choose bathroom vanity sink centering for a hotel room?
Start with the room approach and the complete below-deck overlay. The basin, faucet, drain, cabinet rails, drawer boxes, mirror line, and side-wall condition need to work as one arrangement. A geometric midpoint is only one possible datum. It is useful only when it also supports the cabinet and the person standing in front of it.
2. Can a bathroom vanity basin be offset?
Yes. An offset may preserve a better drawer arrangement, avoid a wall conflict, or create useful counter space. The offset must appear on the top, cabinet, plumbing, mirror, and room-type drawings. If it appears only on the stone template, another trade can easily return the layout to the middle by mistake.
3. Does an undermount sink change drawer planning?
It often does. Bowl depth, clips, the drain, and the trap can reduce usable upper-drawer space. Check the exact sink and cabinet section together before production. A front elevation cannot prove that the drawer will clear the service components behind it.
4. What should a vanity mock-up photograph show?
Show the wall datum, bowl and faucet in place, open drawers, fitted trap, reachable valves, and rear cleaning zone. The images should identify the room type. A close-up of the top is useful, but it should never be the only approval evidence for a cabinet-and-plumbing decision.
For bathroom vanity sink centering, include one front photograph and one below-deck photograph in the signed first-unit record.
5. What should happen when an installed sink position differs from the approved drawing?
Photograph the issue with a readable scale, stop repeated installation, and send the images with the signed overlay and inspection records to the supplier and installer. Do not alter later rooms until the source condition is understood. A small shift can affect the top, cabinet, drain, and faucet at once.
Quick-Reference Checklist for bathroom vanity sink centering
- Overlay the sink cutout, drain, faucet, and cabinet interior on one drawing.
- Mark a wall datum instead of measuring critical centers from unfinished edges.
- Open the actual drawer around the fitted trap during mock-up approval.
- Check faucet handle movement against the backsplash and mirror line.
- Give each distinct room type its own signed layout.
- Keep first-unit photographs with the production record.
One final bathroom vanity sink centering review before repeated fabrication is cheaper than asking every later room to absorb the same unseen cabinet conflict.
Final Conclusion
Bathroom vanity sink centering deserves the same care as the visible finish because it affects the person using the room every day. Here's what I'd do: approve the bowl, drain, faucet, drawer, and service space together on a real unit, then repeat that record rather than repeating a drawing assumption. At KA UNITED, I would rather correct one line on an overlay than ask a hotel team to live with a drawer that cannot open.
References
- Faucet, Wikipedia.
- NKBA Bathroom Planning Guidelines, National Kitchen and Bath Association.
- Plumbing and Mechanical Systems Design Guidance, International Code Council.
- Bathroom Fixtures and Fittings, ASTM International.
- Hotel Design Standards: Guest Bathroom Planning, American Hotel and Lodging Educational Institute.
- Search Essentials, Google Search Central.